Quantcast
Channel: Algorithm – The Crazy Programmer
Viewing all 56 articles
Browse latest View live

Asymptotic Notations

$
0
0

Here you will learn about Asymptotic Analysis and Asymptotic Notations in detail.

It is common that we write Algorithm before writing code to any problem. There may exist more than one solution for a particular problem. But we need the solution which is better in time and space complexities. To compare and analyse algorithms complexities we do some analysis called Asymptotic Analysis. That is, we are concerned with the how running time of an algorithm increases with the input. Usually an algorithm asymptotically more efficient will be the best choice.

Also Read: Analysis of Algorithms

Asymptotic Notations

Asymptotic Notations are mathematical tools to represent time complexity of algorithms for asymptotic analysis.

Most commonly used three asymptotic notations are:

Big Oh Notation (O)

Big Oh Notation (O)

It is represented by O (capital alphabet O). See the above diagram.

The function f(n) represents that, how running time of the program is increasing when giving larger inputs to the problem.

Now, we try to find what is the worst case or upper bound of the function f(n). So we draw another function g(n) which is always greater than f(n) after some limit n = n0.

Therefore we say f(n) = O(g(n)), in the condition that, f(n) <= c g(n), where n >= n0., c > 0, n>= 1.

This says that f(n) is smaller than g(n). 

Example

Let f(n) = 3n+2; g(n) = n. To say that f(n) = O g(n),

We need to prove that, f(n) <= cg(n); where c > 0, n>= 1

3n+2 <= cn; If we substitute c = 4, then 3n+2 <= 4n. If we simplify n >= 2.

Therefore for every n >= 2 and c = 4, f(n) <= c g(n). So f(n) = O g(n).

Here we proved that, n is bounding given function so definitely greater than “n”, those are n2, n3.. also upper bound this function. But as per Big-O definition, we are interested in tightest (closest) upper bound. That is the reason we write 3n+2 = O(n).

Big Omega Notation (Ω)

Big Omega Notation (Ω)

It is represented by Greek letter Ω.

See the above picture, the actual increasing function of the algorithm is f(n). And we want to give a lower bound for that, it is cg(n).

cg(n) is less than f(n) after some value of n = n0.

f(n) >= cg(n) , n >= n0, c > 0, n>= 1.

If it satisfies above conditions we say, g(n) is smaller than f(n).

Example

Let, f(n) = 3n+2. g(n) = n.

Now check can this f(n) has lower bound as g(n) or not.

f(n) = Ω g(n), this will happen only if f(n) >= c g(n).

i.e 3n+2 >= cn.  Here c = 1 and n0 >= 1. This is satisfied so f(n) = Ω g(n).

Therefore, 3n+2 is lower bounded by n. Here also since n is lower bound of 3n+2, anything less than n also lower bound to 3n+2. That log(n), log log(n), like that. But as per definition we should take tightest lower bound, which is n.

Big Theta Notation (Θ)

Big Theta Notation (Θ)

This represented by Greek letter Θ.

See the above picture, f(n) is actual growing function. We should find the both the upper bound and lower bound just by varying the constant c, with same function. Here that function is g(n).

If f(n) is bounded by c1 g(n) and c2 g(n) we can say that f(n) = Θ g(n). Constants c1 and c2 could be different.

Therefore we say f(n) = Θ g(n) , if f(n) is bounded by g(n) both in the lower and upper.

c1 g(n) <= f(n) <= c2 g(n), where c1, c2 > 0, n >= n0, n0 >= 1.

Example

F(n) = 3n+2, g(n) = n.

F(n) <= c g(n) where c = 4; That is 3n+2 <= 4n. This is valid for all n>= 1.

So we can say g(n) is upper bound for f(n). Now see it is as well as lower bound also.

F(n) >= c g(n); That is 3n+2 >=  n. where n0 >= 1.

So both the cases are valid for this.

This theta notation also called asymptotically equal.

Applications of These Notations in Algorithms

  • The Big-O notation says the worst case complexity of the algorithm. That means with any large amount of input, that program never exceeds this complexity.
  • The Big-Omega notation says that best case complexity of the algorithm. That means with any small input, the program never executes less than this complexity.
  • Theta notation gives the average case of complexity.
  • Most of the cases we are interested in what is the worst case complexity of the program.

For more understanding, see the example below.

Let there is an array of “n” elements. We want to search an element “x” in that array.

If we do linear search we may find that element at first index i.e in Ω (1) time. This is the best case of this algorithm.

In worst case our element “x” many not exists in array. In that case we must check all elements and end up with no result. i.e O (n) time. This is the worst case of this algorithm.

Average case is, at some index of array we find that element i.e Θ (n/2) complexity.

Some common asymptotic notations are:

Constant time: O(1)

Logarithmic: O(log n)

Linear: O(n)

Quadratic: O(n2)

Cubic: O(n3)

Polynomial: nO(1)

Exponential: 2O(n)

Comment below if you have queries or found any information incorrect in above tutorial for asymptotic notations.

The post Asymptotic Notations appeared first on The Crazy Programmer.


Vigenere Cipher in C and C++

$
0
0

In this tutorial you will learn about vigenere cipher in C and C++ for encryption and decryption.

Vigenere Cipher is kind of polyalphabetic substitution method. It is used for encryption of alphabetic text. For encryption and decryption Vigenere Cipher Table is used in which alphabets from A to Z are written in 26 rows.

Vigenere Cipher Table

Also Read: Caesar Cipher in C and C++ [Encryption & Decryption]

Also Read: Hill Cipher in C and C++ (Encryption and Decryption)

Vigenere Cipher Encryption

Message Text: THECRAZYPROGRAMMER

Key: HELLO

Here we have to obtain a new key by repeating the given key till its length become equal to original message length.

New Generated Key: HELLOHELLOHELLOHEL

For encryption take first letter of message and new key i.e. T and H. Take the alphabet in Vigenere Cipher Table where T row and H column coincides i.e. A.

Repeat the same process for all remaining alphabets in message text. Finally the encrypted message text is:

Encrypted Message: ALPNFHDJAFVKCLATIC

The algorithm can be expressed in algebraic form as given below. The cipher text can be generated by below equation.

E= (P+ Ki) mod 26

Here P is plain text and K is key.

Vigenere Cipher Decryption

Encrypted Message: ALPNFHDJAFVKCLATIC

Key: HELLO

New Generated Key: HELLOHELLOHELLOHEL

Take first alphabet of encrypted message and generated key i.e. A and H. Analyze Vigenere Cipher Table, look for alphabet A in column H, the corresponding row will be the first alphabet of original message i.e. T.

Repeat the same process for all the alphabets in encrypted message.

Original Message: THECRAZYPROGRAMMER

Above process can be represented in algebraic form by following equation.

Pi = (E– Ki + 26) mod 26

We will use above algebraic equations in the program.

Program for Vigenere Cipher in C

#include<stdio.h>
#include<string.h>

int main(){
    char msg[] = "THECRAZYPROGRAMMER";
    char key[] = "HELLO";
    int msgLen = strlen(msg), keyLen = strlen(key), i, j;

    char newKey[msgLen], encryptedMsg[msgLen], decryptedMsg[msgLen];

    //generating new key
    for(i = 0, j = 0; i < msgLen; ++i, ++j){
        if(j == keyLen)
            j = 0;

        newKey[i] = key[j];
    }

    newKey[i] = '\0';

    //encryption
    for(i = 0; i < msgLen; ++i)
        encryptedMsg[i] = ((msg[i] + newKey[i]) % 26) + 'A';

    encryptedMsg[i] = '\0';

    //decryption
    for(i = 0; i < msgLen; ++i)
        decryptedMsg[i] = (((encryptedMsg[i] - newKey[i]) + 26) % 26) + 'A';

    decryptedMsg[i] = '\0';

    printf("Original Message: %s", msg);
    printf("\nKey: %s", key);
    printf("\nNew Generated Key: %s", newKey);
    printf("\nEncrypted Message: %s", encryptedMsg);
    printf("\nDecrypted Message: %s", decryptedMsg);

	return 0;
}

Output

Original Message: THECRAZYPROGRAMMER
Key: HELLO
New Generated Key: HELLOHELLOHELLOHEL
Encrypted Message: ALPNFHDJAFVKCLATIC
Decrypted Message: THECRAZYPROGRAMMER

Program for Vigenere Cipher in C++

#include<iostream>
#include<string.h>

using namespace std;

int main(){
    char msg[] = "THECRAZYPROGRAMMER";
    char key[] = "HELLO";
    int msgLen = strlen(msg), keyLen = strlen(key), i, j;

    char newKey[msgLen], encryptedMsg[msgLen], decryptedMsg[msgLen];

    //generating new key
    for(i = 0, j = 0; i < msgLen; ++i, ++j){
        if(j == keyLen)
            j = 0;

        newKey[i] = key[j];
    }

    newKey[i] = '\0';

    //encryption
    for(i = 0; i < msgLen; ++i)
        encryptedMsg[i] = ((msg[i] + newKey[i]) % 26) + 'A';

    encryptedMsg[i] = '\0';

    //decryption
    for(i = 0; i < msgLen; ++i)
        decryptedMsg[i] = (((encryptedMsg[i] - newKey[i]) + 26) % 26) + 'A';

    decryptedMsg[i] = '\0';

    cout<<"Original Message: "<<msg;
    cout<<"\nKey: "<<key;
    cout<<"\nNew Generated Key: "<<newKey;
    cout<<"\nEncrypted Message: "<<encryptedMsg;
    cout<<"\nDecrypted Message: "<<decryptedMsg;

	return 0;
}

Comment below if you have queries or found anything incorrect in above tutorial for vigenere cipher in C and C++.

The post Vigenere Cipher in C and C++ appeared first on The Crazy Programmer.

Rail Fence Cipher Program in C and C++[Encryption & Decryption]

$
0
0

Here you will get rail fence cipher program in C and C++ for encryption and decryption.

It is a kind of transposition cipher which is also known as zigzag cipher. Below is an example.

Rail Fence Cipher Example

Here Key = 3. For encryption we write the message diagonally in zigzag form in a matrix having total rows = key and total columns = message length. Then read the matrix row wise horizontally to get encrypted message.

Rail Fence Cipher Program in C

#include<stdio.h>
#include<string.h>

void encryptMsg(char msg[], int key){
    int msgLen = strlen(msg), i, j, k = -1, row = 0, col = 0;
    char railMatrix[key][msgLen];

    for(i = 0; i < key; ++i)
        for(j = 0; j < msgLen; ++j)
            railMatrix[i][j] = '\n';

    for(i = 0; i < msgLen; ++i){
        railMatrix[row][col++] = msg[i];

        if(row == 0 || row == key-1)
            k= k * (-1);

        row = row + k;
    }

    printf("\nEncrypted Message: ");

    for(i = 0; i < key; ++i)
        for(j = 0; j < msgLen; ++j)
            if(railMatrix[i][j] != '\n')
                printf("%c", railMatrix[i][j]);
}

void decryptMsg(char enMsg[], int key){
    int msgLen = strlen(enMsg), i, j, k = -1, row = 0, col = 0, m = 0;
    char railMatrix[key][msgLen];

    for(i = 0; i < key; ++i)
        for(j = 0; j < msgLen; ++j)
            railMatrix[i][j] = '\n';

    for(i = 0; i < msgLen; ++i){
        railMatrix[row][col++] = '*';

        if(row == 0 || row == key-1)
            k= k * (-1);

        row = row + k;
    }

    for(i = 0; i < key; ++i)
        for(j = 0; j < msgLen; ++j)
            if(railMatrix[i][j] == '*')
                railMatrix[i][j] = enMsg[m++];

    row = col = 0;
    k = -1;

    printf("\nDecrypted Message: ");

    for(i = 0; i < msgLen; ++i){
        printf("%c", railMatrix[row][col++]);

        if(row == 0 || row == key-1)
            k= k * (-1);

        row = row + k;
    }
}

int main(){
    char msg[] = "Hello World";
    char enMsg[] = "Horel ollWd";
    int key = 3;

    printf("Original Message: %s", msg);

    encryptMsg(msg, key);
    decryptMsg(enMsg, key);

    return 0;
}

Output

Original Message: Hello World
Encrypted Message: Horel ollWd
Decrypted Message: Hello World

Rail Fence Cipher Program in C++

#include<iostream>
#include<string.h>

using namespace std;

void encryptMsg(char msg[], int key){
    int msgLen = strlen(msg), i, j, k = -1, row = 0, col = 0;
    char railMatrix[key][msgLen];

    for(i = 0; i < key; ++i)
        for(j = 0; j < msgLen; ++j)
            railMatrix[i][j] = '\n';

    for(i = 0; i < msgLen; ++i){
        railMatrix[row][col++] = msg[i];

        if(row == 0 || row == key-1)
            k= k * (-1);

        row = row + k;
    }

    cout<<"\nEncrypted Message: ";

    for(i = 0; i < key; ++i)
        for(j = 0; j < msgLen; ++j)
            if(railMatrix[i][j] != '\n')
                cout<<railMatrix[i][j];
}

void decryptMsg(char enMsg[], int key){
    int msgLen = strlen(enMsg), i, j, k = -1, row = 0, col = 0, m = 0;
    char railMatrix[key][msgLen];

    for(i = 0; i < key; ++i)
        for(j = 0; j < msgLen; ++j)
            railMatrix[i][j] = '\n';

    for(i = 0; i < msgLen; ++i){
        railMatrix[row][col++] = '*';

        if(row == 0 || row == key-1)
            k= k * (-1);

        row = row + k;
    }

    for(i = 0; i < key; ++i)
        for(j = 0; j < msgLen; ++j)
            if(railMatrix[i][j] == '*')
                railMatrix[i][j] = enMsg[m++];

    row = col = 0;
    k = -1;

    cout<<"\nDecrypted Message: ";

    for(i = 0; i < msgLen; ++i){
        cout<<railMatrix[row][col++];

        if(row == 0 || row == key-1)
            k= k * (-1);

        row = row + k;
    }
}

int main(){
    char msg[] = "Hello World";
    char enMsg[] = "Horel ollWd";
    int key = 3;

    cout<<"Original Message: "<<msg;

    encryptMsg(msg, key);
    decryptMsg(enMsg, key);

    return 0;
}

Comment below if you have queries related to above rail fence cipher program in C and C++.

The post Rail Fence Cipher Program in C and C++[Encryption & Decryption] appeared first on The Crazy Programmer.

Binary Search in C

$
0
0

Here you will get program for binary search in C.

Binary search algorithm can be applied on a sorted array to search an element. Search begins with comparing middle element of array to target element. If both are equal then position of element is returned. If target element is less than middle element of array then upper half of array is discarded and again search continued by dividing the lower half. If target element is greater than middle element then lower half is discarded and search is continued in upper half.

Binary Search in C

Worst Case Time Complexity: O(log n)

Best Case Time Complexity: O(1)

Also Read: Linear Search in C

Program for Binary Search in C

Below program shows the implementation of binary search algorithm in C.

#include<stdio.h>

int main()
{
    int arr[50],i,n,x,flag=0,first,last,mid;

    printf("Enter size of array:");
    scanf("%d",&n);
    printf("\nEnter array element(ascending order)\n");

    for(i=0;i<n;++i)
        scanf("%d",&arr[i]);

    printf("\nEnter the element to search:");
    scanf("%d",&x);

    first=0;
    last=n-1;

    while(first<=last)
    {
        mid=(first+last)/2;

        if(x==arr[mid]){
            flag=1;
            break;
        }
        else
            if(x>arr[mid])
                first=mid+1;
            else
                last=mid-1;
    }

    if(flag==1)
        printf("\nElement found at position %d",mid+1);
    else
        printf("\nElement not found");

    return 0;
}

Output

Enter size of array:6

Enter array element(ascending order)
20 27 40 50 58 99

Enter the element to search:27

Element found at position 2

The post Binary Search in C appeared first on The Crazy Programmer.

Difference between Flowchart and Algorithm

$
0
0

Welcome back readers, today I’ll be discussing the difference between flowchart and algorithm. But before getting started, I want to discuss a bit about both the topics.

Flowchart

A flowchart is a diagram which represents different steps that can help in solving a problem. It is a diagram which is made step by step using different shapes and sizes of arrows which show their connection.

It was first introduced by Frank Gilbert in 1921. The chart consists of some mathematical shapes like arrows, square, rhombus or diamond, hexagon, parallelogram, etc.

Types of flowchart:

  • Document flowchart
  • Diagram flowchart
  • System flowchart
  • Data flowchart

It is a flow of information that illustrates a solution model to a particular program. It is the pictorial form of representation of a process and algorithm is done using a step by step process.

Algorithm

An algorithm is a step by step process which is used in solving mathematical or sometimes computational problems. The word ‘algorithm’ came from al-Khwarizmi. He was a Persian astronomer, geographer, mathematician and scholar.

Other ways of classification for algorithms is through the means of recursion, serial, parallel or distributed and they can be also viewed as controlled logical deduction.

An algorithm can be expressed in any language including natural language, programming language, pseudocode etc. They can be converted into flowcharts.

Difference between Flowchart and Algorithm

Flowchart vs Algorithm – Difference between Flowchart and Algorithm

Flowchart Algorithm
Block by block information diagram representing the data flow. Step by step instruction representing the process of any solution.
Easy to understand by any person. Bit difficult for the layman.
It uses symbols for processes and I/O. No symbols are used, completely in text.
Have some rule to create. No hard and fast rule.
Difficult to debug errors. Easy to debug errors.
It is easy to make flowchart. It is difficult to write algorithm as compared to flowchart.

Now let’s discuss the advantages and disadvantages of both.

Advantages of Flowchart

  • It is an easy and efficient way to analyze problem using a flowchart.
  • It is easy in converting the flowchart into code as the logic can be understood easily.
  • It is an efficient way of communicating and noobs can understand easily.
  • It is easy in drawing a flowchart if you know the process.

Disadvantages of Flowchart

  • Drawing a flowchart can be very time-consuming.
  • Programs are not easier in debugging.
  • If the flowchart is complex, writing code can be very confusing.
  • Even the drawing of the flowchart will be complicated if the logic is complicated.

Advantages of Algorithm

  • It makes the representation of a solution to a problem easy, which makes easier in understanding.
  • It can be easily understood by a person without even having the knowledge of programming.
  • It follows a definite procedure.

Disadvantages of Algorithm

  • It takes very long in writing an algorithm.
  • It is not a computer program, neither it helps in reducing the difficulties while writing a code.

If you have any doubts related to flowchart vs algorithm, then feel free to ask it in the comment section below.

The post Difference between Flowchart and Algorithm appeared first on The Crazy Programmer.

Data Encryption Standard (DES) Algorithm

$
0
0

Data Encryption Standard is a symmetric-key algorithm for the encrypting the data. It comes under block cipher algorithm which follows Feistel structure. Here is the block diagram of Data Encryption Standard.

DES Algorithm Block Diagram

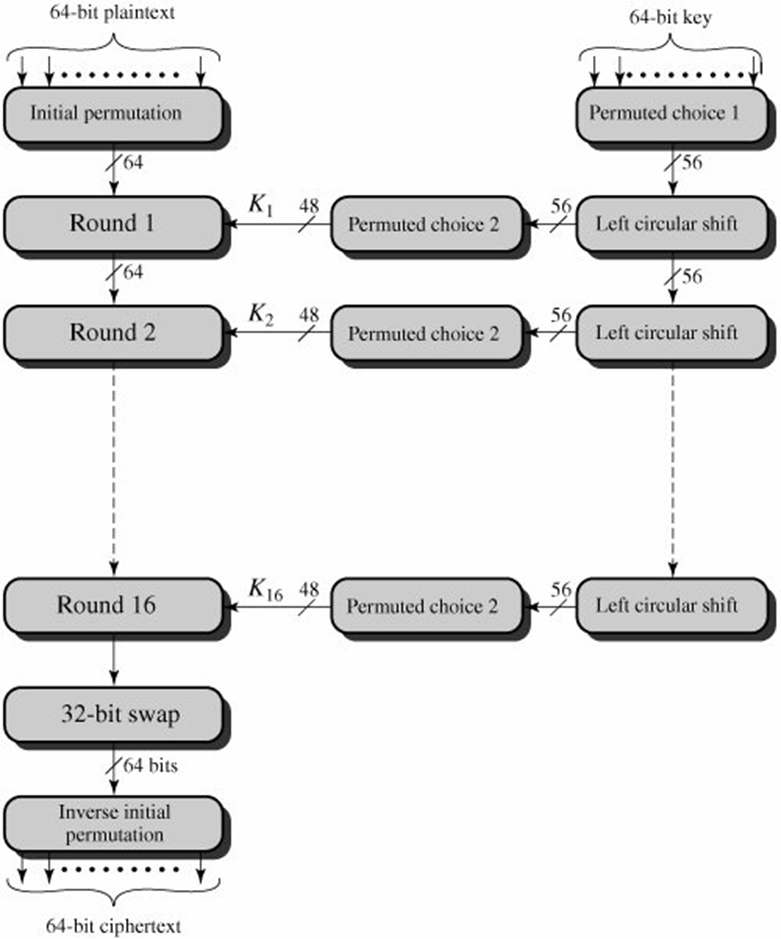
Fig1: DES Algorithm Block Diagram [Image Source: Cryptography and Network Security Principles and Practices 4th Ed by William Stallings]

Explanation for above diagram: Each character of plain text converted into binary format. Every time we take 64 bits from that and give as input to DES algorithm, then it processed through 16 rounds and then converted to cipher text.

Initial Permutation: 64 bit plain text goes under initial permutation and then given to round 1. Since initial permutation step receiving 64 bits, it contains an 1×64 matrix which contains numbers from 1 to 64 but in shuffled order. After that, we arrange our original 64 bit text in the order mentioned in that matrix. [You can see the matrix in below code]

After initial permutation, 64 bit text passed through 16 rounds. In each round it processed with 48 bit key. That means we need total 16 sub keys, one for each round. See below diagram, it will show what happening in each round of algorithm.

Single Round of DES Algorithm

Fig2: Single Round of DES Algorithm. [Image Source: Cryptography and Network Security Principles and Practices 4th Ed by William Stallings]

Round i: In each round 64bit text divided into two 32bit parts. Left and Right. You can see in diagram Li-1 and Ri-1. As algorithm says, Right 32bits goes under Expansion Permutation.

Expansion Permutation: Right side 32bit part of text given to expansion permutation. It will produce a 48bit text as output. i.e. 16bits added in this step. Some bits below 32 are repeated and arranged in an 1×48 matrix form. We rearrange 32bit text by following the order of that matrix. [See the matrix in below code]

After expansion permutation we have to XOR the output 48bit with a 48bit sub key. Let see how that 48bit sub key generating from 64bit original key.

Permutated Choice 1: Initially we take a 64 bit key and then apply to permutated choice 1. It contains a 1×56 matrix but with shuffled 1 to 64 numbers except multiples of number 8. i.e. 8, 16, 24, 32, 40, 48, 56, 64 will be discarded. Remaining 64-8 = 56 number will be there in 1×56 matrix. We rearrange key in matrix specified order. [You can see the matrix in below code]

Left Circular Shift: 56bit key from permutated choice 1 given to left circular shift operation. Here that 56bit key divided into two equal halves of each 28bit. These 28bits shifted depends upon the round number. We already have the data that in each round how many bits circularly we have to shift. You can see this data in shifts array in code.

Permutated Choice 2: Result of Left circular shift 56bit key given to permutated choice 2. This step will produce 48bit sub key. For this it has an 1×48 matrix, in which out of 56, some random 8 bits will be discarded. And remaining 48 will be there. According to this bit positions we have to rearrange the key. You can see this matrix in below code.

Now output of permutated choice 2 will be Xor with output of expansion permutation, which results a 48bit one. This 48bit again reduced to 32bit using Substitution boxes [called S box].

Substitution boxes [S box]: In DES algorithm we have 8 S boxes. Input for S box is 48bit. And output from S box is 32 bit. The input 48 bit will be divided equally to 8 s boxes from s1, s2, … s8. So each s box will get 48/8= 6 bits as input. This Each S box reduce 6 bits to 4 bits. i.e input for each S box is 6 bits and output is 4 bits. Finally, 8*4 = 32 bit. Which is final output of S box operation.

Let see how 6bits converted to 4 bits from S box. S box is an 4×16 matrix containing numbers in range 0 to 15. Take example, assume input 6 bits for S box are 011011. In this first and last bit together represents row number. Since maximum number with two bits is 3, S box also contains 0 to 3 rows total of 4. And middle 4 numbers together represent column number. Since maximum number with 4 bits is 15, S box also contains columns 0 to 15 total of 16. So here first and last bit = 01 i.e. row number 1 and middle 4 bits 1101= 13 i.e. column number 13. So for this input the number positioned at row 1 and column 13 will be picked. As mentioned earlier S box only contains number in range 0 to 15. All can be represented in 4 bits. So picked number 4 bits are output for the S box. See the code for all S boxes.

Permutation: After getting output from all S boxes, we are applying again permutation. Here also a matrix with different arrangements will be there, we have to arrange according to that.

Final XOR: After this permutation, take the left half which initially divided 64bit text to two halves. Do XOR with this permutation output to left 32bit part. This result is new Right part. And Right 32bit part which passed through all permutation will be come as new Left Part. These 2 parts will be the inputs for the second round. Same as keys also, the parts before left shift are next round input keys.

All this explanation for a single round for a 62bit plain text. Like this, it passes through total 16 rounds.

32 bit swap: After completion of 16 rounds, final 64 bits divided into two 32 bit parts and they swap each other.

Inverse Initial Permutation: Here also a matrix will be there, in which bits are just shuffled. No adding or subtracting bits. See the code for this matrix.

Program for DES Algorithm in C

#include <stdio.h>

int Original_key [64] = { // you can change key if required
	0, 0, 0, 1, 0, 0, 1, 1, 0, 0, 1, 1, 0, 1, 0, 0,
	0, 1, 0, 1, 0, 1, 1, 1, 0, 1, 1, 1, 1, 0, 0, 1,
	1, 0, 0, 1, 1, 0, 1, 1, 1, 0, 1, 1, 1, 1, 0, 0,
	1, 1, 0, 1, 1, 1, 1, 1, 1, 1, 1, 1, 0, 0, 0, 1
};

int Permutated_Choice1[56] = {
	  57, 49, 41, 33, 25, 17,  9,
	   1, 58, 50, 42, 34, 26, 18,
	  10,  2, 59, 51, 43, 35, 27,
	  19, 11,  3, 60, 52, 44, 36,
	  63, 55, 47, 39, 31, 23, 15,
	   7, 62, 54, 46, 38, 30, 22,
	  14,  6, 61, 53, 45, 37, 29,
	  21, 13,  5, 28, 20, 12,  4
};

int Permutated_Choice2[48] = {
	  14, 17, 11, 24,  1,  5,
	   3, 28, 15,  6, 21, 10,
	  23, 19, 12,  4, 26,  8,
	  16,  7, 27, 20, 13,  2,
	  41, 52, 31, 37, 47, 55,
	  30, 40, 51, 45, 33, 48,
	  44, 49, 39, 56, 34, 53,
	  46, 42, 50, 36, 29, 32
};

int Iintial_Permutation [64] = {
	  58, 50, 42, 34, 26, 18, 10, 2,
	  60, 52, 44, 36, 28, 20, 12, 4,
	  62, 54, 46, 38, 30, 22, 14, 6,
	  64, 56, 48, 40, 32, 24, 16, 8,
	  57, 49, 41, 33, 25, 17,  9, 1,
	  59, 51, 43, 35, 27, 19, 11, 3,
	  61, 53, 45, 37, 29, 21, 13, 5,
	  63, 55, 47, 39, 31, 23, 15, 7
};

int Final_Permutation[] = 
{
	  40, 8, 48, 16, 56, 24, 64, 32,
	  39, 7, 47, 15, 55, 23, 63, 31,
	  38, 6, 46, 14, 54, 22, 62, 30,
	  37, 5, 45, 13, 53, 21, 61, 29,
	  36, 4, 44, 12, 52, 20, 60, 28,
	  35, 3, 43, 11, 51, 19, 59, 27,
	  34, 2, 42, 10, 50, 18, 58, 26,
	  33, 1, 41,  9, 49, 17, 57, 25
};

int P[] = 
{
	  16,  7, 20, 21,
	  29, 12, 28, 17,
	   1, 15, 23, 26,
	   5, 18, 31, 10,
	   2,  8, 24, 14,
	  32, 27,  3,  9,
	  19, 13, 30,  6,
	  22, 11,  4, 25
};

int E[] = 
{
	  32,  1,  2,  3,  4,  5,
	   4,  5,  6,  7,  8,  9,
	   8,  9, 10, 11, 12, 13,
	  12, 13, 14, 15, 16, 17,
	  16, 17, 18, 19, 20, 21,
	  20, 21, 22, 23, 24, 25,
	  24, 25, 26, 27, 28, 29,
	  28, 29, 30, 31, 32,  1
};

int S1[4][16] = 
{
		14,  4, 13,  1,  2, 15, 11,  8,  3, 10,  6, 12,  5,  9,  0,  7,
		0, 15,  7,  4, 14,  2, 13,  1, 10,  6, 12, 11,  9,  5,  3,  8,
		4,  1, 14,  8, 13,  6,  2, 11, 15, 12,  9,  7,  3, 10,  5,  0,
		15, 12,  8,  2,  4,  9,  1,  7,  5, 11,  3, 14, 10,  0,  6, 13
};

int S2[4][16] = 
{
	15,  1,  8, 14,  6, 11,  3,  4,  9,  7,  2, 13, 12,  0,  5, 10,
	 3, 13,  4,  7, 15,  2,  8, 14, 12,  0,  1, 10,  6,  9, 11,  5,
	 0, 14,  7, 11, 10,  4, 13,  1,  5,  8, 12,  6,  9,  3,  2, 15,
	13,  8, 10,  1,  3, 15,  4,  2, 11,  6,  7, 12,  0,  5, 14,  9
};

int S3[4][16] = 
{
	10,  0,  9, 14,  6,  3, 15,  5,  1, 13, 12,  7, 11,  4,  2,  8,
	13,  7,  0,  9,  3,  4,  6, 10,  2,  8,  5, 14, 12, 11, 15,  1,
	13,  6,  4,  9,  8, 15,  3,  0, 11,  1,  2, 12,  5, 10, 14,  7,
	 1, 10, 13,  0,  6,  9,  8,  7,  4, 15, 14,  3, 11,  5,  2, 12
};

int S4[4][16] = 
{
	 7, 13, 14,  3,  0,  6,  9, 10,  1,  2,  8,  5, 11, 12,  4, 15,
	13,  8, 11,  5,  6, 15,  0,  3,  4,  7,  2, 12,  1, 10, 14,  9,
	10,  6,  9,  0, 12, 11,  7, 13, 15,  1,  3, 14,  5,  2,  8,  4,
	 3, 15,  0,  6, 10,  1, 13,  8,  9,  4,  5, 11, 12,  7,  2, 14
};

int S5[4][16] = 
{
	 2, 12,  4,  1,  7, 10, 11,  6,  8,  5,  3, 15, 13,  0, 14,  9,
	14, 11,  2, 12,  4,  7, 13,  1,  5,  0, 15, 10,  3,  9,  8,  6,
	 4,  2,  1, 11, 10, 13,  7,  8, 15,  9, 12,  5,  6,  3,  0, 14,
	11,  8, 12,  7,  1, 14,  2, 13,  6, 15,  0,  9, 10,  4,  5,  3
};

int S6[4][16] = 
{
	12,  1, 10, 15,  9,  2,  6,  8,  0, 13,  3,  4, 14,  7,  5, 11,
	10, 15,  4,  2,  7, 12,  9,  5,  6,  1, 13, 14,  0, 11,  3,  8,
	 9, 14, 15,  5,  2,  8, 12,  3,  7,  0,  4, 10,  1, 13, 11,  6,
	 4,  3,  2, 12,  9,  5, 15, 10, 11, 14,  1,  7,  6,  0,  8, 13
};

int S7[4][16]= 
{
	 4, 11,  2, 14, 15,  0,  8, 13,  3, 12,  9,  7,  5, 10,  6,  1,
	13,  0, 11,  7,  4,  9,  1, 10, 14,  3,  5, 12,  2, 15,  8,  6,
	 1,  4, 11, 13, 12,  3,  7, 14, 10, 15,  6,  8,  0,  5,  9,  2,
	 6, 11, 13,  8,  1,  4, 10,  7,  9,  5,  0, 15, 14,  2,  3, 12
};

int S8[4][16]= 
{
	13,  2,  8,  4,  6, 15, 11,  1, 10,  9,  3, 14,  5,  0, 12,  7,
	 1, 15, 13,  8, 10,  3,  7,  4, 12,  5,  6, 11,  0, 14,  9,  2,
	 7, 11,  4,  1,  9, 12, 14,  2,  0,  6, 10, 13, 15,  3,  5,  8,
	 2,  1, 14,  7,  4, 10,  8, 13, 15, 12,  9,  0,  3,  5,  6, 11
};

int shifts_for_each_round[16] = { 1, 1, 2, 2, 2, 2, 2, 2, 1, 2, 2, 2, 2, 2, 2, 1 };
int _56bit_key[56];
int _48bit_key[17][48];
int text_to_bits[99999], bits_size=0;
int Left32[17][32], Right32[17][32];
int EXPtext[48];
int XORtext[48];
int X[8][6];
int X2[32];
int R[32];
int chiper_text[64];
int encrypted_text[64];

int XOR(int a, int b) {
	return (a ^ b);
}

void Dec_to_Binary(int n) 
{ 
    int binaryNum[1000]; 
    int i = 0; 
    while (n > 0) { 
        binaryNum[i] = n % 2; 
        n = n / 2; 
        i++; 
    } 
    for (int j = i - 1; j >= 0; j--) {
			text_to_bits[bits_size++] = binaryNum[j]; 
	}
} 

int F1(int i)
{
	int r, c, b[6];
	for (int j = 0; j < 6; j++)
		b[j] = X[i][j];

	r = b[0] * 2 + b[5];
	c = 8 * b[1] + 4 * b[2] + 2 * b[3] + b[4];
	if (i == 0)
		return S1[r][c];
	else if (i == 1)
		return S2[r][c];
	else if (i == 2)
		return S3[r][c];
	else if (i == 3)
		return S4[r][c];
	else if (i == 4)
		return S5[r][c];
	else if (i == 5)
		return S6[r][c];
	else if (i == 6)
		return S7[r][c];
	else if (i == 7)
		return S8[r][c];
}


int PBox(int pos, int bit)
{
	int i;
	for (i = 0; i < 32; i++)
		if (P[i] == pos + 1)
			break;
	R[i] = bit;
}

int ToBits(int value)
{
	int k, j, m;
	static int i;
	if (i % 32 == 0)
		i = 0;
	for (j = 3; j >= 0; j--) 
	{
		m = 1 << j;
		k = value & m;
		if (k == 0)
			X2[3 - j + i] = '0' - 48;
		else
			X2[3 - j + i] = '1' - 48;
	}
	i = i + 4;
}

int SBox(int XORtext[])
{
	int k = 0;
	for (int i = 0; i < 8; i++)
		for (int j = 0; j < 6; j++)
			X[i][j] = XORtext[k++];

	int value;
	for (int i = 0; i < 8; i++) 
	{
		value = F1(i);
		ToBits(value);
	}
}

void expansion_function(int pos, int bit)
{
	for (int i = 0; i < 48; i++)
		if (E[i] == pos + 1)
			EXPtext[i] = bit;
}

void cipher(int Round, int mode)
{
	for (int i = 0; i < 32; i++)
		expansion_function(i, Right32[Round - 1][i]);

	for (int i = 0; i < 48; i++) 
	{
		if (mode == 0)
			XORtext[i] = XOR(EXPtext[i], _48bit_key[Round][i]);
		else
			XORtext[i] = XOR(EXPtext[i], _48bit_key[17 - Round][i]);
	}

	SBox(XORtext);

	for (int i = 0; i < 32; i++)
		PBox(i, X2[i]);
	for (int i = 0; i < 32; i++)
		Right32[Round][i] = XOR(Left32[Round - 1][i], R[i]);
}

void finalPermutation(int pos, int bit)
{
	int i;
	for (i = 0; i < 64; i++)
		if (Final_Permutation[i] == pos + 1)
			break;
	encrypted_text[i] = bit;
}

void Encrypt_each_64_bit (int plain_bits [])
{
	int IP_result [64] , index=0;
	for (int i = 0; i < 64; i++) {
		IP_result [i] = plain_bits[ Iintial_Permutation[i] ];
	}
	for (int i = 0; i < 32; i++)
		Left32[0][i] = IP_result[i];
	for (int i = 32; i < 64; i++)
		Right32[0][i - 32] = IP_result[i];

	for (int k = 1; k < 17; k++) 
	{ // processing through all 16 rounds
		cipher(k, 0);

		for (int i = 0; i < 32; i++)
			Left32[k][i] = Right32[k - 1][i]; // right part comes as it is to next round left part
	}

	for (int i = 0; i < 64; i++) 
	{ // 32bit swap as well as Final Inverse Permutation
		if (i < 32)
			chiper_text[i] = Right32[16][i];
		else
			chiper_text[i] = Left32[16][i - 32];
		finalPermutation(i, chiper_text[i]);
	}

	for (int i = 0; i < 64; i++)
		printf("%d", encrypted_text[i]);
}


void convert_Text_to_bits(char *plain_text){
	for(int i=0;plain_text[i];i++){
		int asci = plain_text[i];
		Dec_to_Binary(asci);
	}
}

void key56to48(int round, int pos, int bit)
{
	int i;
	for (i = 0; i < 56; i++)
		if (Permutated_Choice2[i] == pos + 1)
			break;
	_48bit_key[round][i] = bit;
}

int key64to56(int pos, int bit)
{
	int i;
	for (i = 0; i < 56; i++)
		if (Permutated_Choice1[i] == pos + 1)
			break;
	_56bit_key[i] = bit;
}

void key64to48(int key[])
{
	int k, backup[17][2];
	int CD[17][56];
	int C[17][28], D[17][28];

	for (int i = 0; i < 64; i++)
		key64to56(i, key[i]);

	for (int i = 0; i < 56; i++)
		if (i < 28)
			C[0][i] = _56bit_key[i];
		else
			D[0][i - 28] = _56bit_key[i];

	for (int x = 1; x < 17; x++) 
	{
		int shift = shifts_for_each_round[x - 1];

		for (int i = 0; i < shift; i++)
			backup[x - 1][i] = C[x - 1][i];
		for (int i = 0; i < (28 - shift); i++)
			C[x][i] = C[x - 1][i + shift];
		k = 0;
		for (int i = 28 - shift; i < 28; i++)
			C[x][i] = backup[x - 1][k++];

		for (int i = 0; i < shift; i++)
			backup[x - 1][i] = D[x - 1][i];
		for (int i = 0; i < (28 - shift); i++)
			D[x][i] = D[x - 1][i + shift];
		k = 0;
		for (int i = 28 - shift; i < 28; i++)
			D[x][i] = backup[x - 1][k++];
	}

	for (int j = 0; j < 17; j++) 
	{
		for (int i = 0; i < 28; i++)
			CD[j][i] = C[j][i];
		for (int i = 28; i < 56; i++)
			CD[j][i] = D[j][i - 28];
	}

	for (int j = 1; j < 17; j++)
		for (int i = 0; i < 56; i++)
			key56to48(j, i, CD[j][i]);
}

int main(){
	char plain_text[] = "tomarrow we wiil be declaring war";
	convert_Text_to_bits(plain_text);
	key64to48(Original_key); // it creates all keys for all rounds
	int _64bit_sets = bits_size/64;
	printf("Decrypted output is\n");
	for(int i=0;i<= _64bit_sets ;i++) {
		Encrypt_each_64_bit (text_to_bits + 64*i);
	}
	return 0;
}

Output

Decrypted output is
0000111001101001001100011010111010010110111010111111111000010111001011111011111101010011011101011011000000111011100100000010110101000101011000011001000000101000001010011110101001011000111010011001110010110011011110110001101110000000001000001001000110111010

The post Data Encryption Standard (DES) Algorithm appeared first on The Crazy Programmer.

Apriori Algorithm

$
0
0

Today we are going to learn about Apriori Algorithm. Before we start with that we need to know a little bit about Data Mining.

What is Data Mining ?

Data Mining is a non-trivial process of identifying valid, novel, potentially useful and ultimately understandable patterns in data.

Apriori Algorithm is concerned with Data Mining and it helps us to predict information based on previous data.

In many e-commerce websites we see a recently bought together feature or the suggestion feature after purchasing or searching for a particular item, these suggestions are based on previous purchase of that item and Apriori Algorithm can be used to make such suggestions.

Before we start with Apriori we need to understand a few simple terms :

Association Mining: It is finding different association in our data.

For E.g. If you are buying butter then there is a great chance that you will buy bread too so there is an association between bread and butter here.

Support: It specifies how many of the total transactions contain these items.

Support(A->B) denotes how many transactions have all items from AUB

Therefore

  • Support(A->B) = P(AUB)
  • Support(A->B) = support(B->A)

Therefore 10% support will mean that 10% of all the transactions contain all the items in AUB.

Confidence: For a transaction A->B Confidence is the number of time B is occuring when A has occurred.

Note that Confidence of A->B will be different than confidence of B->A.

Confidence(A->B) = P(AUB)/P(A).

Support_Count(A): The number of transactions in which A appears.

An itemset having number of items greater than support count is said to be frequent itemset.

Apriori algorithm is used to find frequent itemset in a database of different transactions with some minimal support count. Apriori algorithm prior knowledge to do the same, therefore the name Apriori. It states that

All subsets of a frequent itemset must be frequent.

If an itemset is infrequent, all its supersets will be infrequent.

Let’s go through an example :

Transaction ID Items
1 I1 I3 I4
2 I2 I3 I5
3 I1 I2 I3 I5
4 I2 I5

We will first find Candidate set (denoted by Ci) which is the count of that item in Transactions.

C1:

Items Support Count
I1 2
I2 3
I3 3
I4 1
I5 3

The items whose support count is greater than or equal to a particular min support count are included in L set

Let’s say support count for above problem be 2

L1:

Items Support Count
I1 2
I2 3
I3 3
I5 3

Next is the joining step we will combine the different element in L1 in order to form C2 which is candidate of size 2 then again we will go through the database and find the count of transactions having all the items. We will continue this process till we find a L set having no elements.

C2:

Items Support Count
I1,I2 1
I1,I3 2
I1,I5 1
I2,I3 2
I2,I5 3
I3,I5 2

We will remove sets which have count less than min support count and form L2

L2:

Items Support Count
I1,I3 2
I2,I3 2
I2,I5 3
I3,I5 2

Now we will join L2 to form C3

Note that we cannot combine {I1,I3} and {I2,I5} because then the set will contain 4 elements. The rule here is the there should be only one element in both set which are distinct all other elements should be the same.

C3:

Items Support Count
I1,I2,I3 1
I1,I3,I5 1
I2,I3,I5 2

L3:

Item Support Count
I2,I3,I5 2

Now we cannot form C4 therefore the algorithm will terminate here.

Now we have to calculate the strong association rules. The rules having a minimum confidence are said to be strong association rules.

Suppose for this example the minimum confidence be  75%.

There can be three candidates for strong association rules.

I2^I3->I5 = support(I2^I3)/support(I5) = ⅔  = 66.66%

I3^I5->I2 = support(I3^I5)/support(I2) = ⅔ = 66.66%

I2^I5->I3 = support(I2^I5)/support(I3) = 3/3 = 100%

So in this example the strong association rule is

I2^I5->I3.

So from the above example we can draw conclusion that if someone is buying I2 and I5 then he/she is most likely to buy I3 too. This is used to make suggestions while we are purchasing online.

The Algorithm to calculate the frequent itemset is as below:

Ck : Candidate Set of size k
Lk : Frequent set of size k
min_sup : Minimum support count
T : Database

For all transactions t in T :
do
	Go through the items in t 
		If item already present in set C1 then increase count
		else insert item in C1 with count 1
end

For all items I in C
do
	If count of I > min_sup
		L1 ← Item in C1
end

for(k=1 ; Lk!=ɸ ; k++)
do	
	Ck+1 ← Candidates generated from Lk
	
	for all transactions t in T 
	do
		if Ck+1 a subset of t 
			increase count of Ck+1
end	
	
For all items I in C
	do
	If count of I > min_sup
			Lk+1 ← Item in Ck
	end
end

Comment down below if you have any queries related to Apriori Algorithm.

The post Apriori Algorithm appeared first on The Crazy Programmer.

Difference between Lossy and Lossless Compression

$
0
0

Lossy and lossless compression are two kinds of data compression techniques. Here in this article, you will get to learn about what is lossy and lossless compression, their differences, and uses.

So, let’s start with the basics.

What is Data Compression?

Data compression is the process of diminishing the storage size of any data or file so that it consumes less space on the disk. It is the technique of modifying, restructuring, encoding and converting the schema or instance of any data to reduce its size.

In simple words, it is converting the file in such a way that its size is reduced to a maximum extent. Data compressions is also known as bit-rate reduction or source coding.

Check the diagram below:

Data-compression

An example of an image that is converted or compressed to reduce its size without losing the ability to reconstruct the image.

Now, the question here is why there is a need for data compression?

There are two primary reasons for the same.

  • Storage – it helps in reducing the size of data that is required to store it on the disk
  • Time – saves time in data transmission as the size is reduced to an extent

You are getting the point!

Now coming back to the main topic, there are mainly two types of data compression techniques. Let’s discuss them.

Data Compression Techniques

Data-compression-techniques

Lossy Compression

Lossy compression is a technique that involves the elimination of a specific amount of data. It helps in reducing the file size to a great extent without any noticeable thing. Also, once the file is compressed, it cannot be restored back to its original form as the data from the file is significantly reduced. This technique is much more useful when the quality of the file is not essential. Additionally, it helps to save much space on the disk to store the data.

Lossy compression is not useful when the quality of the file is essential. Besides, if there’s any further analysis to be processed on the record, this method is not ideal. This method is generally used for audio and video compression, where there is a significant amount of data loss, and even users cannot recognize it.

Example of lossy compression: JPEG image

lossy-compression

Image Source

“Compressed image (left) shows blocking artifacts compared to the original image (right) as a result of the JPEG compression scheme used.”

Lossless Compression

Lossless compression is a technique that involves only a certain amount of elimination of data. This technique also helps in reducing the file size, but not to the greater extent as that of lossy compression. Instead, in this method, if the file is compressed, it can be restored back to its original form. Further, the quality of the data is not compromised; hence, the reduction in size is not much.

Lossless compression is not useful when you want reduced size for extra storage. Also, if there is any further analysis to be performed on the file, lossless compression is not beneficial. It is useful for maintaing the originality of files by eliminating only unwanted data. This technique is commonly used for text files, sensitive documents, and confidential information.

Example of lossless compression: PNG image

lossless-compression

Image Source

“The original image (left) is identical to the compressed image (right). It is represented by the identical graphs at the bottom that show the grey values for the pixels in each column is the same between the two images.”

Difference between Lossy and Lossless Compression

Basis Lossy Compression Lossless Compression
Definition Lossy compression is a technique that involves the elimination of a specific amount of data. It helps in reducing the file size to a great extent without any noticeable thing Lossless compression is a technique that involves only a certain amount of elimination of data. This technique also helps in reducing the file size, but not to the greater extent
Compression Ratio High Low
File Quality Low High
Elimination of Data Even the necessary data is also removed which isn’t noticeable Only some specific amount of unwanted data is removed
Restoration Cannot restore its original form Can restore its original form
Loss of Information This technique involves some loss of information This technique doesn’t include any loss of information
Data Accommodation More data accommodation Less data accommodation
Distortion Files are distorted No distortion
Data holding capacity More Less
Algorithms Used Transform coding, DCT, DWT, fractal compression, RSSMS RLW, LZW, Arithmetic encoding, Huffman encoding, Shannon Fano coding
File Types JPEG, GIF, MP3, MP4, MKV, OGG, etc. RAW, BMP, PNG, WAV, FLAC, ALAC, etc.

Which One to Use?

Although both are the types of data compression, each can be useful under different situations. Like, lossy compression helps in reducing the file size, which means it is helpful to those who have vast amounts of data stored on the database. So, this technique is useful in storing the data with a much-diminished size. Also, for webpages files of such lower size is beneficial for faster loading.

Further, this process doesn’t allow any after analysis of the data once the compression is completed. Also, the file cannot be restructured in its original form as it involves the loss of data.

Unlike lossy compression, lossless compression doesn’t involve any loss of data. Neither the quality of data is compromised, nor the size of data is excessively reduced. It keeps the original format so it can be restored, and further operation can be performed. This method is helpful for those who need to access the data back again without compromising its quality.

Final Words

Both lossy compression and lossless compression helps in the compression of data in their unique way. While lossy compression is useful to store data by compromising the data, lossless compression doesn’t. Lossless compression technique is beneficial for maintaing the originality of data, and lossy compression, on the other hand, doesn’t. Both the methods are helpful in database management, to identify and compress files accordingly.

If there’s any other query regarding data compression or both the techniques of data compression, then let us know in the comment box below.

The post Difference between Lossy and Lossless Compression appeared first on The Crazy Programmer.


LRU Cache – Design and Implementation in Java

$
0
0

In this article we will learn how to design a LRU Cache, understand it’s cache replacement algorithm. We also look at description of LRU Cache with some examples. Then, we look at the implementation of this design in code with their complexity analysis.

Caching is a method of organizing data in a faster memory, usually RAM to serve future requests of same data in a efficient way. It avoids repetitive main memory access by storing frequently accessed data in cache. However, the Cache size is usually not big enough to store large data sets compared to main memory. So, there is a need for cache eviction when it becomes full. There are many algorithms to implement cache eviction. LRU caching is a commonly used cache replacement algorithm.

Least Recently Used (LRU) Cache organizes data according to their usage, allowing us to identify which data item hasn’t been used for the longest amount of time. The main idea is to evict the oldest data or the least recently used from the cache to accommodate more data followed with replacement of data if already present in the cache (Cache Hit) and bring it in the front or top of the cache for quick access.

LRU Cache

Example:

Let’s consider a cache of capacity 4 with elements already present as:

Elements are added in order 1,2,3 and 4. Suppose we need to cache or add another element 5 into our cache, so after adding 5 following LRU Caching the cache looks like this:

So, element 5 is at the top of the cache. Element 2 is the least recently used or the oldest data in cache. Now if we want to access element 2 again from the cache. The cache becomes:

So, element 2 comes to the top of the cache. Element 3 is the least recent used data and next in line for eviction.

LRU Cache Implementation

We follow these steps to implement a LRU Cache in our program:

  • We use two Data Structures a Deque or Doubly Ended Queue, where insertion and deletion can take place from both ends and a Hash-Map. The Deque will act as our Cache.
  • In Queue, we enter each element at first/front of the queue, so we use a Deque. If we need to access any element already present in our cache we search that element in queue, remove it and then add it to the front of the queue/cache. But searching an element in queue could take O(n) time in worst case and will be a costly operation.
  • So, to avoid this we use a Hash-Map which provides look-up or search time for our keys in O(1) time. Then, we can directly delete the element without the need to search in cache. So if our Hash-Map contains the data then we can just bring that element to the front of queue and add data as entry to our map for future look-ups.
  • If our capacity is full then we remove from the rear end of Deque which contains least recent data. Along with this, we remove the entry of the element from our Map.
  • So, we mainly need to implement two methods for our cache: One to get element from cache and other to add element into our cache following the LRU algorithm and above steps.
  • In get method we need to just get the value of data item if it’s present in our cache. In put method we add the data into our cache and the Map and update the order of cache elements.

Why Hash-Map not Hash-Set?

Since we only need to search whether an element is present in our cache or not we can also do it by using a Hash-Set then what is the purpose of Hash-Map. The reason is while accessing resources from the Cache a key is required to access the data. The key will be unique for each data. So with the key we can access the actual data. In real life scenario, for a product there can be many attributes we need to access with the product key. As we know, Hash-Map stores data in Key-Value Pair the Key Field holds the key of data and Value field can hold the actual data or attributes.

Now let’s look at the implementation of above in Java:

//import the required collection classes
import java.util.Deque;
import java.util.HashMap;
import java.util.LinkedList;
import java.util.Map;

class CacheObject 
{
  int key;              // key to access actual data
  String value;         // data to be accessed by cache
  
  CacheObject(int key, String value) {
    this.key = key;
    this.value = value;
  }
}

public class LRUCache {
  
  //  queue which acts as Cache to store data.
  static Deque<Integer> q = new LinkedList<>(); 
  
  // Map to store key value pair of data items.
  static Map<Integer, CacheObject> map = new HashMap<>();
  int CACHE_CAPACITY = 4;

  public String getElementFromCache(int key) // get data from cache if key is already present.
  {
      
    // if item present in cache remove and add to front of cache
    if(map.containsKey(key)) 
    {
      CacheObject current = map.get(key);
      q.remove(current.key);
      q.addFirst(current.key);
      return current.value;
    } 
    
    return "No such element present in Cache";
  }
  
  public void putElementInCache(int key, String value) 
  {
    if(map.containsKey(key)) 
    {
      CacheObject curr = map.get(key);     // we check if element already present in cache through Map
      q.remove(curr.key);                  // remove if already present
    }
    else 
    {
      if(q.size() == CACHE_CAPACITY) 
      {
        int temp = q.removeLast();  // if cache size is full we remove from last of queue
        map.remove(temp);
      }
    }

    // then we just add already present item or new item with given key and value.
    
    CacheObject newItem = new CacheObject(key, value);
    q.addFirst(newItem.key);   
    map.put(key, newItem);
  }
  
  // Driver Code to test above methods.
  public static void main(String[] args) 
  {
    
    LRUCache cache = new LRUCache();
    cache.putElementInCache(1, "Product-A-Name");
    cache.putElementInCache(2, "Product-B-Name");
    cache.putElementInCache(3, "Product-C-Name");
    cache.putElementInCache(4, "Product-D-Name");
    
    // We get 2 from cache
    System.out.println(cache.getElementFromCache(2));
    System.out.println();
    
    // We print our queue and see 2 will be at front of cache    
    System.out.println(q);
    System.out.println();
    
    //Element 5 is not present in Cache
    System.out.println(cache.getElementFromCache(5));
    cache.putElementInCache(5,"Product-E-Name");
    System.out.println();
    
    //Now after adding 5 in cache it will be at front and 1 is deleted.
    System.out.println(q);
    System.out.println();
    
  }

}

Output:

Product-B-Name

[2, 4, 3, 1]

No such element present in Cache

[5, 2, 4, 3]

So this was the implementation of LRU Cache in code let’s have a look at the time and space complexities of our approach.

Time Complexity: Basically we implement this cache in O(1) time, as the search for an element present in cache require constant time and with our Map the search time is also constant. In put method, we add elements to front of cache which also require constant time. So overall time is O(1).

Space Complexity: We use a Deque which store n number of keys and a Map which store n Key-Value pairs so the overall space complexity is O(n).

That’s it for the article you can post your doubts in the comment section below.

The post LRU Cache – Design and Implementation in Java appeared first on The Crazy Programmer.

Kadane’s Algorithm (Maximum Sum Subarray Problem) in Java

$
0
0

In this article, we will understand the idea of Kadane’s Algorithm. We discuss this with the help of an example and also discuss a famous interview problem related to it. Then, we will look at the implementation and analyze the complexities of our approach.

Kadane’s Algorithm

This algorithm is useful in solving the famous ‘Maximum Sum Subarray’ problem. The problem states that given an array we need to find the contiguous subarray with maximum sum and print the maximum sum value. So, how does Kadane’s Algorithm help us in this problem?

The basic idea is to find all contiguous segments of an array whose sum will give us the maximum value. Kadane’s algorithm scans the given array from left to right. In the ith step, it computes the subarray with the largest sum ending at i starting for each subarray.

For example, let us consider this array:

For the given array the maximum subarray exists for [ 1 2 3 6] highlighted in the image and the maximum sum is 12.

Algorithm

Now we look at the algorithm to find the maximum sum subarray.

1. We have two variables max_till_here and max_sum and initialize each variable with the first element of our array.

2. The max_till_here will hold the maximum of all elements or the maximum sum of all elements whichever is greater for a subarray. The max_sum will be our result variable which will contain the maximum of all max_till_here values.

3. So, we start iterating from index 1 or the second element of our array and keep doing the above steps. We keep adding the current array element if its sum with max_till_here is greater than the current element otherwise the max_till_here holds the value of the current element. We also update the max_sum variable with the maximum of max_sum and max_till here on each iteration.

Let us understand these steps with the above mentioned example:

Given Array arr : [ -4, 2, -5, 1, 2, 3, 6, -5, 1]

Initialize 
max_till_here = arr[0] or -4
max_sum = arr[0] or -4

For each iteration, we calculate max_till_here and max_sum as
max_till_here = max(arr[i], max_till_here+arr[i])
max_sum = max(max_sum, max_till_here)

We start at i=1, arr[1] = 2
max_till_here = max(2,-4+2) = max(2,-2) = 2
max_sum = max(-4,2) = 2

At i=2, arr[2] = -5
max_till_here = max(-5,2+(-5)) = max(-5,-3) = -3
max_sum = max(2,-3) = 2

At i=3, arr[3] = 1
max_till_here = max(1,-3+1) = max(1,-2) = 1
max_sum = max(2,1) = 2

At i=4, arr[4] = 2
max_till_here = max(2,1+2) = max(1,3) = 3
max_sum = max(2,3) = 3

At i=5, arr[5] = 3
max_till_here = max(3,3+3) = max(3,6) = 6
max_sum = max(3,6) = 6

At i=6, arr[6] = 6
max_till_here = max(6,6+6) = max(6,12) = 12
max_sum = max(6,12) = 12

At i=7, arr[7] = -5
max_till_here = max(-5,12+(-5)) = max(-5,7) = 7
max_sum = max(12,7) = 12

At i=8, arr[8] = 1
max_till_here = max(1,7+1) = max(1,8) = 8
max_sum = max(12,8) = 12

This is the working of the above algorithm for the above mentioned example in the image. You can see the max_sum obtained is 12.

Implementation in Java

Now we look at the implementation of the above discussed example in Java:

public class KadaneMaximumSumSubarray 
{
 
    static int maximumSubArraySum(int arr[])       //declaring method static help us to call method directly
    {
    int n=arr.length;
    int max_till_here = arr[0];                     //Initialize max_till_here and max_sum with 
    int max_sum = arr[0];                           // first element of array.
 
    for (int i = 1; i < n; i++)                     // We start iterating from second element.  
    {
        max_till_here = Math.max(arr[i], max_till_here + arr[i]);
        max_sum = Math.max(max_sum, max_till_here);
    }
    return max_sum;                             // At the end return max_sum which contain maximumSubArraySu
    }
 
    /* Driver Code to test above methods */
    public static void main(String[] args)
    {
    int arr[] = {-4, 2, -5, 1, 2, 3, 6, -5, 1};
    int max_sum = maximumSubArraySum(arr);             // we call the function to get the result 
    
    System.out.println("Maximum Sum of Contiguous Subarray is : "+ max_sum);
    
    }
}

Output:

Maximum Sum of Contiguous Subarray is : 12

Note: The above discussed approach also handles the case when the input array has all elements negative. In that case, the maximum element of array is our output.

Now, let us have a look at the time and space complexities of Kadane’s algorithm implementation in calculating the maximum subarray sum.

Time Complexity: We traverse the whole array only once while performing operations that require constant time so the time complexity is O(n).

Space Complexity: We do not use any auxiliary space so complexity is O(1).

That’s all for the article the algorithm is explained above you can try it out with other examples with the code.

Let us know if you have any queries in the comment section below.

The post Kadane’s Algorithm (Maximum Sum Subarray Problem) in Java appeared first on The Crazy Programmer.

Master’s Theorem Explained with Examples

$
0
0

In this article, we will have a look at the famous Master’s Theorem. This is very useful when it comes to the Design and analysis of Algorithms following Divide and Conquer Technique. We will cover the theorem with its working and look at some examples related to it.

Master’s Theorem is Used For?

Master’s Method is functional in providing the solutions in Asymptotic Terms (Time Complexity) for Recurrence Relations. In simpler terms, it is an efficient and faster way in providing tight bound or time complexity without having to expand the relation. However, it is mainly responsible for Recurrence Relations based on Divide and Conquer Technique. Recurrence Relation is basically an equation where the next term of a function is dependent on its previous terms. We will have a look at it with some examples.

The Theorem is applicable for relations of the form:

T(n)= a T( n/b ) + f(n)

where a>=1, b>1.

Let us look at each term, here:

n-> Indicates the Size of Problem.

a -> Number of Subproblems in the Recursive Relation.

b -> Factor by which size of each Subproblem is reduced in each call.

n/b -> Size of each Subproblem  (Usually Same).

f(n) ->  Θ(nk logp  n ) ,where k >= 0 and p is a real number; It is cost or work done in merging each subproblem to get solution.

T(n) -> Indicates the total time taken to evaluate the Recurrence.

Master’s Theorem Cases

Now, Master’s Method determines the Asymptotic Tight Bound (Θ or Theta) on these recurrences considering 3 Cases:

Case 1

If  a > bk , then T(n)= Θ (n log b a )   [  log b a = log a / log b. ].

Let us understand this Case with example:

Suppose we are given a Recurrence Relation, T(n) =  16 T(n/4) + n .

Solution: 

For this relation, a = 16 , b = 4 , f(n) = Θ (nk logp  n) = n, where p=0 and k=1.

As we can see, value of a = 16 and value of bk  = 41 = 4. So a > bwhich falls under this Case 1 so the solution of this Recurrence Relation, T(n) = Θ ( n log b a ) = Θ ( n log 4 16  ).

Now  log 4 16 = log 16 / log 4 = log 42 / log 4 = 2 log 4 / log 4 = 2.

So, T(n) = Θ ( n2 ), is the tight bound runtime for this relation.

Case 2

If a = b, then there are again three possibilities to determine T(n) :

 1. If p > -1

In this case, the value of T(n) = Θ (n log b a logp+1  n).

Let us also look at this case with Recurrence Relation:

T(n) = 2 T(n/2) + n.

Solution:

For this relation,  a = 2, b = 2, f(n) = Θ (nk logp  n) = n, where k=1 and p=0.

Here, value of bk = 2, so a = bk , This falls under Case 2 moreover p > -1 so the solution for this relation will be:

T(n) = Θ (n log b a logp+1  n) = Θ (n log 2 2 log0+1  n) = Θ (n log n), is the tight bound for this relation.

Note: The above equation is the Recurrence relation of Merge Sort Algorithm, which has the time complexity of O(n log n), in all cases. So we can see with Master Theorem we easily determine the running time of any algorithm.

2. If p = -1

For this case, T(n) = Θ (n log b a log log n).

Let us evaluate this case with an example too.

Consider the following Recurrence Relation :

T(n) = 2 T(n/2) + n/log n.

Solution:

In this relation, a = 2, b = 2, f(n) = Θ (nk logp  n) = n/log n, where k =1 and p=-1.

Value of bk = 2, so a = bk , This falls under Case 2 moreover p = -1, so the solution is :

T(n) = Θ (n log 2 2 log log n) = Θ (n  log (log n)), is the tight bound for this recurrence.

Note: In this type of recurrences, at each step, the size of the subproblem shrinks by Square Root of n. The difference between and  is not polynomial, this is an extended version.

3. If p < -1

In this case, T(n) = Θ (nlog b a ).

Consider this Recurrence: T(n) = 8 T(n/2) + n3 / logn.

Here a = 8, b = 2, f(n) = Θ (nk logp  n) = n3  log n, where k=3, p = -2.

So, Value of bk = 8 and a = bk , falls under Case 2 .

Therefore, T(n) = Θ (nlog 2 8 ) [ log 2 8 = log 8/ log 2 = 3 log 2/log 2= 3] .

So, T(n) = Θ (n3 ).

This type of condition ( p < -1) is not generally encountered.

Case 3

For the last case, If a < b the asymptotic bounds are rounded again to two possibilities :

1. If p >= 0

When a < b and p is greater than 0, then solution, T(n) = Θ (n  log p n).
Let us consider an example to have a clear idea :

T(n) = 2 T(n/4) + n 0.62 .

Solution:

So for this Recurrence relation, a = 2, b = 4, f(n) = Θ (nk logp  n) = n 0.62 , where k = 0.62 and p=0.

Hence, b= 4 0.62 = 2.36 and a < bk . This make the recurrence fall under Case 3. Along with this, p >= 0.

Thus, T(n) = Θ (n  log p n) = Θ (n0.62  log0  n) = Θ (n0.62 ), is the tight bound Asymptotic Notation for this type of recurrence.

2. If p < 0

The Solution is given by, T(n) = Θ ( nk ).

Considering this Relation : T(n) = 2 T(n/4) + n0.51 / log n . Let’s outline the solution.

Solution:

Here, a = 2, b = 4, f(n) = Θ (nk logp  n) = n0.51 log-1 n, where k = 0.51 and p = -1. The condition a < bsatisfies as b = 2.027, falls under case 3 and p = -1 < 0.

So solution is T(n) = Θ ( n0.51 ).

So we have discussed all the cases for Master Method related to Divide and Conquer Recurrences. Now let us have a quick look at the Limitations of Master Method before ending this article.

Limitations of Master’s Theorem

  • Master’s theorem cannot be used if f(n), the combination/merging time is not positive. For Ex: T(n) = 16 T(n/2) – n, cannot be evaluated using this method as f(n) = – n.
  • The value of a should be constant and always greater than 1 . a denotes the number of sub-problems which should be fixed cannot be a function of n. E.g. T(n) = 2T(n/2) + n, cannot be solved using Master Method, a is not constant.
  • There should be at least one subproblem. Eg. T(n) = 0.5 T(n/2) + 2, cannot be evaluated as a = 0.5 < 1 .
  • The value of b must be > 1 and constant. Otherwise, the subproblems will keep increasing at each step and we never reach the base case for the recursion to end.

So that’s it for the article you can practice the examples discussed above. You can also practice some examples for better understanding here. Let us know your doubts or any suggestions in the comment section below.

The post Master’s Theorem Explained with Examples appeared first on The Crazy Programmer.

Tarjan’s Algorithm with Implementation in Java

$
0
0

In this article, we will look at a famous algorithm in Graph Theory, Tarjan Algorithm. We will also look at an interesting problem related to it, discuss the approach and analyze the complexities.

Tarjan’s Algorithm is mainly used to find Strongly Connected Components in a directed graph. A directed graph is a graph made up of a set of vertices connected by edges, where the edges have a direction associated with them.  A Strongly Connected Component in a graph is basically a self contained cycle within a directed graph where from each vertex in a given cycle we can reach every other vertex in that cycle.

Let us understand this with help of an example, consider this graph:

Tarjan Algorithm

In the above graph, the box A and B show the SCC or Strongly Connected Components of the graph. Let us look at a few terminologies before explaining why the above components are SCC.

  • Back-Edge: So an edge of nodes (u,v) is a Back-Edge, if the edge from u to v has Descendent-Ancestor relationship. The node u is the descendant node and node v is the ancestor node. In this case, it results in a cycle and is important in forming a Strongly Connected Component.
  • Cross-Edge: An edge (u,v) is a Cross-Edge, if the edge from the u to v has no Ancestor-Descendent relationship. They are not responsible for forming a SCC. They mainly connect two SCC’s together.
  • Tree-Edge: If an edge (u,v) has a Parent-Child relationship such an edge is Tree-Edge. It is obtained during the DFS traversal of the tree which forms the DFS tree of the graph.

Explanation:

So, in the above graph edges -> (1 , 3), (3 , 2), (4 , 5), (5 , 6), (6 , 7) are the tree edges because they follow the Parent-Child Relationship. Edges -> (2 , 1) and (7 , 4) form the back edges because from node 2 (Descendent) we go back to 1 (Ancestor) completing a cycle (1->3->2). Similarly, from edge 7 we go back to  4 completing a cycle ( 4-> 5 -> 6 ->7). Hence the components (1,3,2) and (4,5,6,7) are the Strongly Connected Components of the graph. The edge (3 , 4) is a Cross edge because it follows no such relationship and connects the two SCC’s together.

Note: A Strongly Connected Component in a graph must have a Back-Edge to its head node.

Tarjan’s Algorithm

Now let us see how Tarjan’s Algorithm will help us find a Strongly Connected Component.

  • The idea is to do a Single DFS traversal of the graph which produces a DFS tree.
  • Strongly Connected Components are the subtrees of the DFS tree. If we find the head of each subtrees,  we can get access to all the nodes in the subtree which is one SCC, then we can print the SCC including the head.
  • We will consider only the tree edges and back edges while traversing, we ignore the cross edges as it separates one SCC from another.

So now, let us look how to implement the above steps. We are going to assign each node a time value for when it is visited or discovered. At root or start node Time value is 0. For every node in the graph, we assign a tuple with two time values: Disc and Low.

Disc: This indicates the time for when a particular node is discovered or visited during DFS traversal. For each node we increase the Disc time value by 1.

Low: This indicates the node with lowest discovery time accessible from a given node. If there is a back edge then we update the low value based on some conditions. The maximum value Low for a node can be assigned is equal to the Disc value of that node since the minimum discovery time for a node is the time to visit/discover itself.

Note: The Disc value once assigned will not change while we keep on updating the low value traversing each node. We will discuss the condition next.

Implementation in Java

Step 1:

We use a Map (Hash-Map) to store the graph nodes and edges. The Key of map stores the nodes and in the value we have a list which represents the edges from that node. For the Disc and Low we use two integer arrays of size same as a number of vertices. We fill both the arrays with -1, to indicate no nodes are visited initially. We use a Stack (for DFS) and a Boolean array inStack to check whether an already discovered node is present in our Stack in O(1) time as checking in the stack will be a costly operation (O(n)).

Step 2:

So, for each node we process we add it into our stack and mark true in the array inStack. We maintain a static Timer variable initialized to 0. If for an edge (u,v) if v node is already present in stack, then it is a back edge and (u,v) pair is Strongly Connected.  So we change the low value as :

if(Back-Edge) then Low[u] = Min ( Low[u] , Disc[v] ).

After visiting this node on returning the call to its parent node we will update the Low value for each node to ensure that Low value remains the same for all nodes in the Strongly Connected Component.

Step 3:

Now if for an edge (u,v) if v node is not present in stack then it is a tree edge or a neighboring edge. In such case, we update the low value for that particular node as :

if (Tree-Edge) then Low[u] = Min ( Low[u] , Low[v] ).

We determine the head or start node of each SCC when we get a node whose Disc[u] = Low[u], such a node is the head node of that SCC. Every SCC should have such a node maintaining this condition. After this, we just print the nodes by popping them out of the stack marking the inStack as false for each popped value.

Note: A Strongly Connected Component must have all its low values same. We will print the nodes in reverse order.

Now, let us look at the code for this in Java:

import java.util.*;
public class TarjanSCC
{
   
  static HashMap<Integer,List<Integer>> adj=new HashMap<>();
  static int Disc[]=new int[8];
  static int Low[]=new int[8];
  static boolean inStack[]=new boolean[8];
  static Stack<Integer> stack=new Stack<>();
  static int time = 0;
  
  static void DFS(int u)
  {
	
	Disc[u] = time;
	Low[u] = time;
	time++;
	stack.push(u);
	inStack[u] = true;
    List<Integer> temp=adj.get(u); // get the list of edges from the node.
    
    if(temp==null)
    return;
    
	for(int v: temp)
	{
		if(Disc[v]==-1)	//If v is not visited
		{
			DFS(v);
			Low[u] = Math.min(Low[u],Low[v]);
		}
		//Differentiate back-edge and cross-edge
		else if(inStack[v])	//Back-edge case
			Low[u] = Math.min(Low[u],Disc[v]);
	}

	if(Low[u]==Disc[u])	//If u is head node of SCC
	{
		System.out.print("SCC is: ");
		while(stack.peek()!=u)
		{
			System.out.print(stack.peek()+" ");
			inStack[stack.peek()] = false;
			stack.pop();
		}
		System.out.println(stack.peek());
		inStack[stack.peek()] = false;
		stack.pop();
	}
  }

static void findSCCs_Tarjan(int n)
  {
	
    for(int i=1;i<=n;i++)
    {
        Disc[i]=-1;
        Low[i]=-1;
        inStack[i]=false;
    }
		

	for(int i=1;i<=n;++i)
	{
		if(Disc[i]==-1)
			DFS(i);   // call DFS for each undiscovered node.
	}
  }

  public static void main(String args[])
  {
    adj.put(1,new ArrayList<Integer>());
    adj.get(1).add(3);
    
    adj.put(2,new ArrayList<Integer>());
    adj.get(2).add(1);
	
	adj.put(3,new ArrayList<Integer>());
	adj.get(3).add(2);
	adj.get(3).add(4);

	adj.put(4,new ArrayList<Integer>());
	adj.get(4).add(5);
	
	adj.put(5,new ArrayList<Integer>());
	adj.get(5).add(6);
	
	adj.put(6,new ArrayList<Integer>());
	adj.get(6).add(7);
	
	adj.put(7,new ArrayList<Integer>());
	adj.get(7).add(4);

	findSCCs_Tarjan(7);
  }

}

Output:

SCC is: 7 6 5 4
SCC is: 2 3 1

The code is written for the same example as discussed above, you can see the output showing the Strongly Connected Components in reverse order since we use a Stack. Now let us look at the complexities of our approach.

Time Complexity: We are basically doing a Single DFS Traversal of the graph so time complexity will be O( V+E ). Here, V is the number of vertices in the graph and E is the number of edges.

Space Complexity: We at the most store the total vertices in the graph in our map, stack, and arrays. So, the overall complexity is O(V).

So that’s it for the article you can try out different examples and execute the code in your Java Compiler for better understanding.

Let us know any suggestions or doubts regarding the article in the comment section below.

The post Tarjan’s Algorithm with Implementation in Java appeared first on The Crazy Programmer.

Boruvka’s Algorithm with Implementation in Java

$
0
0

In this article, we will have a look at another interesting algorithm related to Graph Theory – Boruvka’s Algorithm. We will also look at a problem with respect to this algorithm, discuss our approach and analyze the complexities.

Boruvka’s Algorithm is mainly used to find or derive a Minimum Spanning Tree of an Edge-weighted Graph. Let us have a quick look at the concept of a Minimum Spanning Tree. A Minimum Spanning Tree or a MST is a subset of edges of a Weighted, Un-directed graph; such that it connects all the vertices together. The resultant subset of the graph must have no cycles or loops within it. Moreover, It should have minimum possible total weight of the edges connecting the tree.

Note: The Minimum Spanning Tree should connect all its vertices. A disconnected graph is not a MST.

Let us understand this with an example, consider this graph:

Boruvka's Algorithm

The above shown graph is an Edge-Weighted, undirected graph with 6 vertices. The minimum Spanning tree of the above graph looks like this:

Boruvka's_MST

Explanation:

The above image shows the Minimum Spanning tree of Graph G, as it connects all the vertices together. The resultant graph has no loops or cycles within it. After trying out various examples we select the smallest edge from each vertex and connect the two vertices together. We avoid connecting those edges which are already processed as it may form a cycle. The Minimum Possible Weight obtained from this MST adding all the weights from respective edges: 1 ( Edge 1 to 2 ) + 4 ( Edge 1 to 4 ) + 5 ( Edge 2 to 3 ) + 3 ( Edge 2 to 5 ) +2  (Edge 5 to 6 ); so Total Weight of MST = 15.

Note: The Maximum Number of Edges present in a Minimum Spanning Tree = Number of Vertices – 1.

Boruvka’s Algorithm

Now let us see how Boruvka’s Algorithm is helpful in finding the MST of a graph.

  • The idea is to separate all nodes at first, then process each node one by one by connecting nodes together from different components.
  • For each node, we find the edge with least weight and connect them to form a component. Then we jump to the next vertex.
  • After this, for each component, we choose the smallest or cheapest edge so that we get disconnected components of graphs. Then we combine the graph using the above process. If any loop or cycle found we ignore those edges.
  • After getting all the disconnected components we try connecting them following the above steps. Each repetition of this process reduces the number of nodes, within each connected component of the graph, to at most half of this former value, so after logarithmically many repetitions the process finishes.
  • At the end, the weight of edges we add from the Minimum Spanning Tree.

Implementation in Java

Step 1:

We represent the Graph using a class with three fields: V, U, and Cost. V is the source vertex , U is the destination and Cost is the weight between V and U. We use two arrays Parent and Min. The Parent Array stores the parent of node and Min stores the Minimum outgoing edge for each pair (v,u). For ith node we initialize its parent value to the same node.

Step 2:

At first we set the number of Components to the number of vertices n. For each component we initialize Min as -1, indicating there is no cheapest edge. For each node in our graph if its source and end vertex are part of same component we do not process them. Otherwise, for each vertex we take their root or parent node and check if it is minimum weighted edge.

Step 3:

Then, we iterate through each component, if there is an each edge for pair (u,v) we merge them into a single component. Before merging we check if the nodes are from same component, on doing this we avoid merging two nodes into same component which might create a loop or cycle. If we are able to merge the two components we add their edge weight. We repeat these steps for each component. This makes sure all edges are visited at least once and on each iteration, we skip (log n) number of nodes.

Now let us look at the implementation of the above in Java code:

import java.util.*;

class Graph_Edge
{
    int v;
    int u;
    int cost;
    Graph_Edge(int v,int u,int cost)
    {
        this.v=v;
        this.u=u;
        this.cost=cost;
    }
}

public class Boruvka_MST
{
  static int parent[] = new int[7];
  static int Min[] = new int[7];

  public static void main(String args[]) 
  {
  // No. of vertices in graph.
  int n=6;     
  Graph_Edge g[]=new Graph_Edge[10];
  
  // Creating the graph with source, end and cost of each edge
  g[1]=new Graph_Edge(1,2,1);
  g[2]=new Graph_Edge(1,4,4);
  g[3]=new Graph_Edge(2,4,7);
  g[4]=new Graph_Edge(2,5,3);
  g[5]=new Graph_Edge(2,6,6);
  g[6]=new Graph_Edge(3,2,5);
  g[7]=new Graph_Edge(3,6,9);
  g[8]=new Graph_Edge(6,5,2);
  g[9]=new Graph_Edge(5,4,8);
  
  // Initializes parent of all nodes.
  init(n);
  
  int edges = g.length-1;
  
  int components = n;
  int ans_MST=0;
  
  while(components>1)
  {
      // Initialize Min for each component as -1.
      for(int i=1;i<=n;i++)
      {
          Min[i]=-1;
      }
      for(int i=1;i<=edges;i++)
      {
          // If both source and end are from same component we don't process them.
          if(root(g[i].v)==root(g[i].u))
          continue;
          
          int r_v=root(g[i].v);
          if(Min[r_v]==-1 || g[i].cost < g[Min[r_v]].cost)
          Min[r_v]=i;
          
          int r_u=root(g[i].u);
          if(Min[r_u]==-1 || g[i].cost < g[Min[r_u]].cost)
          Min[r_u]=i;
          
      }
      
      for(int i=1;i<=n;i++)
      {
          if(Min[i]!=-1)
          {
              if(merge(g[Min[i]].v,g[Min[i]].u))
              {
                  ans_MST+=g[Min[i]].cost;
                  components--;
              }
          }
      }
  }
  
  System.out.println("The Total Weight of Minimum Spanning Tree is : "+ans_MST);
  
  }

  static int root(int v)
  {
      if(parent[v]==v)
      return v;
      
      return parent[v]=root(parent[v]);
  }
  
  static boolean merge(int v,int u)
  {
      v=root(v);
      u=root(u);
      if(v==u)
      return false;
      parent[v]=u;
      return true;
  }

  static void init(int n)
  {
      for(int i=1;i<=n;i++)
      {
          parent[i]=i;
      }
  }
  
}

Output:

The Total Weight of Minimum Spanning Tree is : 15

Note: We take Graph array of size 10 for total no. of edges are 9 as discussed in the example above and vertices are named from 1. The same is for Parent and Min array, we take size 7 for 6 vertices.

We have implemented the code for the same example as shown above. Now let us have a quick look at the complexities.

Time Complexity: For N nodes of graph, we have E edges to check the minimum weighted edge we have to iterate through all the edges and on each iteration the total nodes to be processed decreases logarithmically. So the overall complexity is O( E * log(N) ) .

Space Complexity: We require extra space to store the Parent and Min edge with respect to each node in our graph of size equal to the total number of vertices N. So the overall complexity is O(N).

Limitation Of Boruvka’s Algorithm

We can see in the above example that we used the graph with edges having distinct weight. This is a limitation for this algorithm which requires the graph to be Edge-Weighted but with Distinct Weights. If edges do not have distinct weights, then a consistent tie-breaking rule can be used. An optimization is to remove each edge in Graph G that is found to connect two vertices in the same component as each other.

So that’s it for the article you can try out this algorithm and dry run with various examples to have a clear idea. You can also execute this code to have a better understanding.

Feel free to leave your suggestions/doubts in the comment section below.

The post Boruvka’s Algorithm with Implementation in Java appeared first on The Crazy Programmer.

Hierholzer’s Algorithm with Implementation in Java

$
0
0

In this article, will look at an interesting algorithm related to Graph Theory: Hierholzer’s Algorithm. We will discuss a problem and solve it using this Algorithm with examples. We will also discuss the approach and analyze the complexities for the solution.

Hierholzer’s Algorithm has its use mainly in finding an Euler Path and Eulerian Circuit in a given Directed or Un-directed Graph. Euler Path (or Euler Trail) is a path of edges that visits all the edges in a graph exactly once. Hence, an Eulerian Circuit (or Cycle) is a Euler Path which starts and ends on the same vertex.

Let us understand this with an example, Consider this Graph :

Hierholzer's Algorithm

In the above Directed Graph, assuming we start from the Node 0 , the Euler Path is : 0 -> 1 -> 4 -> 3 -> 1 -> 2 and the Eulerian Circuit is as follows : 0 -> 1 -> 4 -> 3 -> 1 -> 2 -> 3 -> 0. We can see that the Eulerian Circuit starts and ends on the same vertex 0.

Note: We see some nodes being repeated in the Euler Path. It is so because the above graph is directed so we have to find a path along the edges. If the above graph was Un-directed the Path would be : 0 -> 1 -> 2 -> 3 -> 4.

Necessary Conditions for Eulerian Circuit

Now let us look at some conditions which must hold for an Eulerian Graph to exist in a Directed Graph.

  • Every vertex must have an equal In-degree and Out-degree. In-degree is the number of edges incident on a vertex. Out-degree is the number of outgoing edges from a vertex.
  • There can be at most one such vertex whose Out-degree – In-degree = 1 and one such vertex whose In-Degree – Out-degree = 1.  Hence, if there are more than one such vertex, it means the Eulerian Circuit does not exist for the graph.
  • All of the vertices having non-zero degree should belong to a Single Strongly Connected Component.
  • Hence, The vertices which follow the second condition can act as the starting and the ending vertices of the Euler Path.

If the In and Out degrees of all vertices are equal to each other. Then any vertex can be our starting node. Generally we choose a vertex with smallest Out-degree or an odd degree vertex..

The In-Degree and Out-Degree of the vertices of the above graph is :

Node 0 -> In-Degree: 1 , Out-Degree: 1. For, Node 1 -> In-Degree: 2 , Out-Degree: 2 . Node 2 -> In-Degree: 1 , Out-Degree: 1 . For, Node 3 -> In-Degree: 2 , Out-Degree: 2. Node 4 -> In-Degree: 1 , Out-Degree: 1.

Hierholzer’s Algorithm

Now let us look at how Hierholzer’s Algorithm is useful in finding Eulerian Circuit for the above graph.

  • For the above graph, we choose Vertex 0 as starting node, follow a trail of edges from that vertex until returning back to it. It is not possible to get stuck at any vertex, because In-degree and Out-degree of every vertex is same.
  • If we come again to the start vertex while all the vertices are not visited yet, we backtrack to the nearest node which has a edge to a unvisited node. We will repeat this process and follow the trail along the directed edges until we get to the starting node and then we unwind the stack and we print the nodes.
  • For each node we visit we will decrement the count of its Outgoing Edges or Out-degree by 1, to ensure that we do not visit the same vertex again unless, there exists a node which has to be visited from that vertex only.

Step-by-Step Example

Let us look at a step by step example how we use this Algorithm for the above example graph.

We start from Node 0 which is our starting node to Node 1. We will decrement the count of the source node’s outgoing edge or Out-degree after every node we visit. So Current Outdegree of Node 0 is 0. Hence, The Eulerian Path looks like :

Hierholzers Algorithm 2

After this, we do a normal DFS Traversal for every node so we visit the node 4 and decrement Outdegree of Node 1 . So Outdegree of Node 1 is 1. The Path now is :

Now, 4 has an outgoing edge to Node 3, we visit it and update its Out-degree which is now 0. Thus now the Euler path is :

So, now 3 has an outgoing edge to Node 1 again, we visit it and decrement its Outdegree to 1. We do not visit node 0 because it has no pending nodes to be visited. Along with this, we have to maintain the constraint that discussed in Step 3 of Algorithm above. So the path now is :

Now, Node 1 has an edge to yet unvisited node 2, we traverse to it and update it’s Outgoing edge count = 1-1 =0.  The updated Path is:

Finally, Node 2 has an edge to node 3, we visit it and update its Outdegree to 0. Thereby completing the Euler Path traversing all the nodes. To complete the cycle or Eulerian Circuit we visit Node 0 from Node 3 which results the original graph.

Thus, the Eulerian Circuit is : 0 -> 1 -> 4 -> 3 -> 1 -> 2 -> 3 -> 0 .

Note: There was no Back-tracking done in this example, as we visited every node once except the condition when node 2 was to be visited.

Implementation in Java

For the implementation we use a 2D – List in Java (Vector in C++), to store the nodes along with their outgoing edges. We will use a Map (Hash-Map) to store count of outgoing edges for each vertex. The Key being the vertex and the Value will be the Out-degree of the same vertex. We use a Stack to maintain which nodes are processed at any instant. As soon as we get the Out-degree for any node equal to 0 we add it to our result array or list.

Let us look at the implementation code in JAVA:

import java.util.*;
public class Hierholzer_Euler
{
  public static void main(String args[]) 
  {
    List< List<Integer> > adj = new ArrayList<>();
  
    // Build the Graph
    adj.add(new ArrayList<Integer>());
    adj.get(0).add(1);
    
    adj.add(new ArrayList<Integer>());
    adj.get(1).add(2);
    adj.get(1).add(4);
    
    adj.add(new ArrayList<Integer>());
    adj.get(2).add(3);
    
    adj.add(new ArrayList<Integer>());
    adj.get(3).add(0);
    adj.get(3).add(1);
    
    adj.add(new ArrayList<Integer>());
    adj.get(4).add(3);
    
    System.out.println("The Eulerian Circuit for the Graph is : ");
    
    printEulerianCircuit(adj);
  
    
  }
  
  static void printEulerianCircuit(List< List<Integer> > adj)
  {
    // adj represents the adjacency list of
    // the directed graph
    // edge represents the number of edges emerging from a vertex
    
    Map<Integer,Integer> edges=new HashMap<Integer,Integer>();
  
    for (int i=0; i<adj.size(); i++)
    {
        //find the count of edges to keep track of unused edges
        edges.put(i,adj.get(i).size());
    }
    
    // Maintain a stack to keep vertices
    Stack<Integer> curr_path = new Stack<Integer>();
  
    // vector to store final circuit
    List<Integer> circuit = new ArrayList<Integer>();
  
    // We start from vertex 0
    curr_path.push(0);
    
    // Current vertex
    int curr_v = 0; 
  
    while (!curr_path.empty())
    {
        // If there's remaining edge
        if (edges.get(curr_v)>0)
        {
            // Push the vertex visited.
            curr_path.push(adj.get(curr_v).get(edges.get(curr_v) - 1)); 
  
            // and remove that edge or decrement the edge count.
            edges.put(curr_v, edges.get(curr_v) - 1);
  
            // Move to next vertex
            curr_v = curr_path.peek();
        }
  
        // back-track to find remaining circuit
        else 
        {
        circuit.add(curr_path.peek());
        curr_v = curr_path.pop();
        }
    }
  
    // After getting the circuit, now print it in reverse
    for (int i=circuit.size()-1; i>=0; i--)
    {
        System.out.print(circuit.get(i));
        
        if(i!=0)
        System.out.print(" -> ");
    }
   
  }
     
}

Output:

The Eulerian Circuit for the Graph is : 
0 -> 1 -> 4 -> 3 -> 1 -> 2 -> 3 -> 0

Now, let us have a quick look at the complexities of this Algorithm.

Time Complexity: We do a modified DFS traversal, where we traverse at most all the edges in the graph to complete the Eulerian Circuit so the time complexity is O(E), for E edges in the Graph. Unlike Fleury’s Algorithm which takes O(E*E) or O(E2) time, Hierholzer’s Algorithm is more efficient.

Space Complexity: For extra Space, we use a Map and a Stack to keep track of the edges of each node and the nodes processed respectively. So we at the most store all the vertices of the Graph, so the overall complexity is O(V), where V is the number of vertices.

That’s it for the article you can try out this Algorithm with different examples and execute the code for better understanding.

Let us know your suggestions or doubts (if any) in the comments section below.

The post Hierholzer’s Algorithm with Implementation in Java appeared first on The Crazy Programmer.

How to Calculate Running Time of an Algorithm?

$
0
0

In this article, we will learn how to deduce and calculate the Running Time of an Algorithm. Also, we will see how to analyze the Time Complexity of the Algorithm. This is very useful when it comes to analyzing the efficiency of our solution. It provides us with the insight to develop better solutions for problems to work on.

Now, the Running Time of an Algorithm may depend on a number of factors :

  1. Whether the machine is a Single or Multiple Processor Machine.
  2. It also depends on the cost of each Read/Write operation to Memory.
  3. The configuration of machine – 32 bit or 64 bit Architecture.
  4. The Size of Input given to the Algorithm.

But, when we talk about the Time Complexity of Algorithm we do not consider the first 3 factors. We are concerned with the last factor i.e. how our program behaves on different Input Sizes. So, mostly we consider the Rate of Growth of Time with respect to the input given to the program.

Now, to determine the Run time of our program, we define a Hypothetical Machine with the following characteristics: Single Processor, 32 bit Architecture. It executes instructions sequentially. We assume the machine takes 1 Unit of Time for each operation ( E.g. Arithmetical, Logical , Assignment, Return etc.).

We take a few examples and try to deduce the Rate of Growth with respect to the input.

Let’s say we have to write a program to find difference of two integers.

difference(a,b)
{
c = a-b          -> 1 unit Time for Arithmetic Subtraction and 1 unit for Assignment
return c         -> 1 unit Time for Return
}

Explanation:

This is the Pseudocode, if we run this program using the model Machine we defined, the total time taken is Tdiff = 1+1+1 =3 units. So we say irrespective of the size of inputs the time taken for execution is always 3 units or constant for every input. Hence, this a Constant Time Algorithm. So, Rate of Growth is a Constant function. To indicate the upper bound on the growth of algorithm we use Big-O Asymptotic Notation. So, to simplify time complexity is O(1) or constant time because the operations only happen once. Since each of our operations has a runtime of O(1), the Big O of our algorithm is O(1 + 1 + 1) = O(3), which we will then simplify to O(1) as we strip our constants and identify our highest-order term. Hence, the Running time will be O(1) .

Let us look at another example suppose we need to calculate the sum of elements in a list.

sumOfArray( A[], N)               COST      TIMES  
{
 sum=0                         ->   1 units     1
                            
 for i=0 to N-1                ->   2 units    N + 1   ( 1 unit for assignment + 1 for increment i)  
   sum = sum + A[i]            ->   2 units     N    ( 1 unit for assignment + 1 unit for sum)

 return sum                    ->   1 units     1
}

Explanation:

This is the Pseudocode for getting the sum of elements in a list or array. The total time taken for this algorithm will be the Cost of each operation * No. of times its executed. So,  Tsum = 1 + 2 * (N+1) + 2* N + 1 = 4N + 4 .

The constants are not important to determine the running time. So, we see the Rate of Growth is a Linear Function, since it is proportional to N, size of array/list. So to simplify the running time and considering the highest order term we say the Running Time is is : O(N) .

Now, if we have to calculate the sum of elements in the matrix of size N*N. The Pseudocode looks like this.

sumOfMatrix( A[][], N)              COST          TIMES
{
total = 0                            1 Unit          1
for i=0 to N-1                       2 Units       N + 1       
 for j=0 to N-1                      2 Units    (N + 1) * (N + 1)  
     total = total + A[i][j]         2 Units       N * N

return total                         1 Unit           1
}

Explanation:

The 1st for loop executes N+1 times for each row to reach end condition (i=n), the 2nd for loop executes (N+1) * (N+1) times for each cell in a column. So, the total time taken by the algorithm,

TsumOfMatrix = 1 + 2 * (N + 1) + 2 * (N+1) * (N+1) + 2 * N * N + 1 = 9N2 + 6N +6. 

So on ignoring the lower order terms and constant we see the Rate of Growth of Algorithm is a Quadratic Function. It is proportional to N2 or the Size of the Matrix. If we plot a graph for the above three functions, for the time taken with respect to its inputs we see:

The Tdiff graph is constant, Tsum grows linearly with input n and TsumOfMatrix grows as a Square Function giving a Parabolic graph. So, in general, we say Running Time of Algorithm = Σ Running Time of All Fragments of Code.

That’s it for the article, you can try out various examples and follow the general thumb rule discussed to analyze the Time Complexity.

Feel free to leave your doubts in the comments section below.

The post How to Calculate Running Time of an Algorithm? appeared first on The Crazy Programmer.


Interpolation Search Algorithm – Time Complexity, Implementation in Java

$
0
0

In this article we will have a look at an interesting Searching Algorithm: Interpolation Search. We will also look at some examples and the implementation. Along with this we look at complexity analysis of the algorithm and its advantage over other searching algorithms.

Interpolation Search is a modified or rather an improved variant of Binary Search Algorithm. This algorithm works on probing position of the required value to search, the search tries to get close to the actual value at every step or until the search item is found. Now, Interpolation search requires works on arrays with conditions:

  • The Array should be Sorted in ascending order.
  • The elements in the Array should have Uniform distribution. In other words, the difference between two successive elements (Arr[i] – Arr[i+1]) in the array for each pair must be equal.

Note: The second condition does not need to be true always. The given array cannot be fairly distributed sometimes. In that case, the probing index will help in search. We will look at the example for such case. The first condition has to be necessarily true.

In Binary Search, we used to get the index of our search element by dividing the array into two halves. So, We get the index of the middle element as mid = (low + high) / 2. If the index given by mid matches our key to search we return it, otherwise we search in the left or right half of the array depending on the value of mid.

Similarly, in the Interpolation search we get the index/position of the element based on a formula :

Index = Low + ( ( (Key – Arr[Low]) * ( High – Low ) ) / Arr[High] -Arr[Low] ).

Let us look at each term:

Arr: Sorted Array.

Low: Index of first element in Array.

High: Index of last element in Array.

Key: Value to search.

Note: The formula helps us get closer to the actual key by reducing number of steps.

Interpolation Search Algorithm

  1. At first, We calculate the Index using the Interpolation probe position formula.
  2. Then, if the value at Index matches the key we search, simply return the index of the item and print the value at that index.
  3. If the item at the Index is not equal to key then we check if the Key is less than Arr[Index], calculate the probe position of the left sub-array by assigning High = Index – 1 and Low remains the same.
  4. If the Key is greater than Arr[Index], we calculate the Index for right subarray by assigning Low = Index + 1 and High remains same.
  5. We repeat these steps in a loop until the sub-array reduces to zero or until Low<=High.

Explanation with Examples

Now, let us understand how the algorithm helps in searching with some examples. There are mainly two cases to consider depending on input array.

Case 1: When Array is Uniformly Distributed

Now, let us look at an example how this formula gets us the index of the element. Consider this Array:

Sorted Uniformly Distributed Array

We can see the above array is sorted and is uniformly distributed in the sense that for each pair of element, e.g. 1 and 3 the difference is 2 and so is for every pair of elements in the array. Now let us assume we need to search for element 9 in the given array of size 8, we will use the above formula to get the index of the element 9.

Index = Low + ( ( (Key – Arr[Low]) * ( High – Low ) ) / Arr[High] -Arr[Low] ).

Here, Low = 0, High = Size – 1 = 8 – 1 = 7. Key = 9 and Arr[Low] = 1 and Arr[High] = 15.

So putting the values in the equation we get,

Index = 0 + ((9 – 1) * (7 – 0) / (15 – 1)) = 0 + ( 56 / 14 ) = 4.

Hence, we get the Index = 4 and at Arr[4] value is 9 and the value is found at index 4. So, we can see we found our key in only one step taking O(1) or Constant time without having the need to traverse the array. In Binary Search, it would have taken O(log n) time to find the key.

Case 2: When Array is Not Fairly/Uniformly Distributed

There might be a case when we will be given a sorted array which may not be fairly distributed i.e. the difference between two elements  for each pair may not be equal. In such condition, we can search the value using Interpolation Search but the difference is the number of steps to get the index will increase. Let us consider understand this with an example.

Here, we can see the above array is Sorted but not fairly distributed as the absolute difference between 10 and 12 is 2 whereas for 12 and 13 is 1, and for every pair the absolute difference is not equal. Now let’s say we want to search for element 13 in the given array of size 6. We will get the index using the Probing Position formula.

Index = Low + ( ( (Key – Arr[Low]) * ( High – Low ) ) / Arr[High] -Arr[Low] ).

Here, Low = 0, High = Size – 1 = 6 – 1 = 5. Key = 13 and Arr[Low] = 10 and Arr[High] = 19.

Now, putting the values we get,

Index = 0 + ((13 – 10) * (5 – 0)) / (19 – 10) = 0 + (3 * 5) / 9 = 15/9 = 1.66 1 ( We approximate to Floor Value).

Now, Arr[Index] = Arr[1] = 12, so Arr[Index] < Key (13) , So we need to follow Step 4 of the Algorithm and we come to know that element exists in right subarray. Hence we assign Low = Index + 1 (1 + 1 = 2) and continue our search.

Hence, Low =  2, High = 5. Key = 13 and Arr[Low] = 13 and Arr[High] = 19.

So, Index = 2 + ((13 – 13) * (5 – 2)) / (19 – 13) = 2 + (0 * 3) / 9 = 2 + 0 = 2.

Now, At Index 2, Arr[Index] = 13 and we return the index of the element.

Implementation in Java

We will search for the element in the array and print the index considering 0 based indexing of array. We will consider both cases discussed above. Now, Let us look at the code for this:

import java.util.*;

public class InterpolationSearch
{
   static int interpolationSearch(int arr[], int low,int high, int key)
   {
     int index;
 
     while(low <= high)
     {
 
      // Calculating Exact Index or Closest Index to Key using Probing Position Formula.
      index = low + ( ( (key - arr[low]) * ( high - low ) ) / (arr[high] - arr[low]));
 
      // Condition when key is found
      if (arr[index] == key)
        return index;
 
      // If key is larger, key is in right sub array
      if (arr[index] < key)
        low = index + 1;
 
      // If key is smaller, key is in left sub array
      if (arr[index] > key)
        high = index - 1;
        
     }
        // if element does not exists  we return -1.
        return -1;
    }
 
  public static void main(String args[])
  {
        // We first perform search for a Sorted Uniformly Distributed Array -- Case 1
        int arr[] = { 1, 3, 5, 7, 9, 11, 13, 15};
 
        // Element to be searched
        int x = 9;
        int index = interpolationSearch(arr, 0, arr.length - 1, x);
 
        System.out.println("The Array is: "+Arrays.toString(arr));
        // If element was found
        if (index != -1)
            System.out.println("Element "+x+" found at index: "+ index);
        else
            System.out.println("Element not found");  
            
        System.out.println();
        
        // Then we perform search for Non-Uniformly Distibuted Array -- Case 2
        arr = new int[]{10, 12, 13, 15, 16, 19};
        
        // we search for value 13
        x = 13;
        index = interpolationSearch(arr, 0, arr.length - 1, x);
 
        System.out.println("The Array is: "+Arrays.toString(arr));
        // If element was found
        if (index != -1)
            System.out.println("Element "+x+" found at index: "+ index);
        else
            System.out.println("Element not found");  
            
  }
  
}

Output:

The Array is: [1, 3, 5, 7, 9, 11, 13, 15]
Element 9 found at index: 4

The Array is: [10, 12, 13, 15, 16, 19]
Element 13 found at index: 2

Time Complexity Analysis

Now, let us now quick look at the time complexity of the Interpolation Search Algorithm. There arise two cases when we consider the input array provided.

  • Best Case: When the given array is Uniformly distributed, then the best case for this algorithm occurs which calculates the index of the search key in one step only taking constant or O(1) time.
  • Average Case: If the array is not fairly distributed but sorted the average case occurs with runtime as O(log (log n)) in favorable situations, as we get close to the actual value’s index then we divide into subarrays. This is an improvisation over binary search algorithm which has O(log n) runtime.

So that’s it for the article you can try out the probing formula with different examples considering the two cases explained and execute the code for a better idea. Feel free to leave your suggestions/doubts in the comment section below.

The post Interpolation Search Algorithm – Time Complexity, Implementation in Java appeared first on The Crazy Programmer.

Viewing all 56 articles
Browse latest View live